react 记录
state状态
关于状态的更新函数 setState
- 在
componentDidMount中执行setState会导致组件在初始化的时候就触发了更新,渲染了两遍,应该尽量避免。有一些场景,比如在组件 DOM 渲染完成后获得 DOM 元素位置或者宽高等等设置未 state,会不得在componentDidMount之后setState,但是除了这些必要的时候,都应该尽量避免在componentDidMount里setState。 - 在
componentWillUnmount中执行setState不会更新 state,是不生效且无意义的。 - 禁止在
shouldComponentUpdate和componentWillUpdate中调用setState,这会造成循环调用,直至耗光浏览器内存后奔溃。了解了生命周期后,这条很好理解。在shouldComponentUpdate或componnentWillUpdate中调用setState会再次触发这两个函数,然后在两个函数中又触发了setState,... 这样就进入了一个不停setState然后不停触发组件更新的死循环里,会导致浏览器内存耗光然后崩溃。 - 在
componentWillReceiveProps中可以setState,不会造成二次渲染。由于只有 props 的变化才会触发componentWillReceiveProps事件,因为在这个事件里setState不会造成不停触发组件更新的死循环,可以放心的在这个函数里setState。
render 小技巧
在使用 react 的 jsx 语法时,可以利用数组将结果返回到 render 的结果中,渲染对应节点。
import React from 'react';
export default class App extends React.Component {
    renderEg() {
        // 基础方式
        // const res = [];
        // res.push(<dt>aa</dt>);
        // res.push(<dd>bb</dd>);

        // 遍历方法
        const arr = [1,3,4];
        const res = [];
        arr.forEach(item => {
            res.push(<dt key={item}>item</dt>);
            res.push(<dd key={item + 100}>{item}</dd>)
        });
        return res;
    }
    render() {
        return (
        	<dl>
            	{this.renderEg()}
            </dl>
        )
    }
}
2
3
4
5
6
7
8
9
10
11
12
13
14
15
16
17
18
19
20
21
22
23
24
25
react 简易子组件
render方法中可抽调出复杂渲染函数到react子类方法下,只要该方法 return 出 jsx 即可:
import React from 'react';
export default class Child extends React.Component {
    renderBtn() {
        if (1 === 0) return null; // 做一些判断
        return (
        	<button>哈哈</button>
        )
    }
    render() {
        <div>
        	<span>demo</span>
            {this.renderBtn()}
        </div>
    }
};
2
3
4
5
6
7
8
9
10
11
12
13
14
15
使用redux的中间件 redux-thunk
首先是百度上的redux 工作流
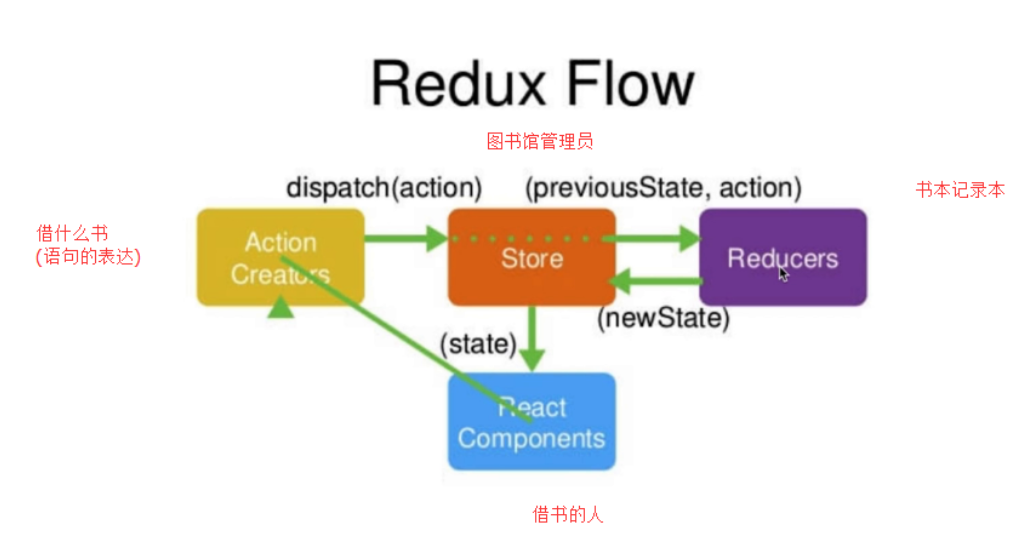
在 Action Creators 转发 action 时,我们有时候需要在 dispatch 前加入其他逻辑,如每次修改的时候都将数据打印出来。我们可以使用 redux 的中间件 applyMiddleware ,它可以改造 dispatch 函数。如下例(其中 next 为 store.dispatch) :
import { creatStore, applyMiddleware } from 'redux';
import reducer from './reducers';
const store = createStore(reducer, applyMiddleware(curStore => next => action => {
    console.log('before dispatch:', curStore.getState(), action);
    return next(action);
}));
2
3
4
5
6
在我们需要在处理异步操作时,会需要通过触发一个 action ,然后等待该 action 操作结束自动触发下一个 action 。如:发起请求更改 userInfo。这个时候就可以用到 react-thunk 了。
其源码如下:
function createThunkMiddleware(extraArgument) {
    return ({ dispatch, getState }) => next => action => {
        if (typeof action === 'function') {
            return action(dispatch, getState, extraArgument);
        }
        return next(action);
    }
}
const thunk = createThunkMiddleware();
thunk.withExtraArgument = createThunkMiddleware;
export default thunk;
2
3
4
5
6
7
8
9
10
11
返回一个柯里化的函数,在其中先判断触发的 action 是否为函数,如果是函数,就执行它,再给它 dispatch 的能力。
使用:
// index.js
import { createStore, applyMiddleware } from 'redux';
import thunk from 'redux-thunk';
import reducer from './reducers';

const store = createStore(
	reducer,
    applyMiddleware(thunk)
);
2
3
4
5
6
7
8
9
// action.js
import axios from 'axios';

export const changeUserInfo = (info) => {
    return {
        type: 'USER_INFO',
        payload: info
    };
};

export const changeUserInfoById = id => {
    return (dispatch, getState) => {
        axios.get(`some/api/${id}`).then(info => {
            dispatch(changeUserInfo(info));
        }).catch(err => {
            dispatch(changeUserIfon({}));
        });
    };
};
2
3
4
5
6
7
8
9
10
11
12
13
14
15
16
17
18
19
// 组件中ComponentA.js
import React from 'react';
import { connect } from 'react-redux';
import { changeUserInfoById } from './actions.js';

class ComponetA extends React.Component {
    render() {
        return <div onClick={this.props.changeInfo.bind(this, 'a123')}>点我</div>
    };
}

const mapDispatchToProps = (dispatch) => {
    return {
        changeInfo: id => {
            dispatch(changeUserInfoById(id));
        }
    };
};
export default connect(mapStateToProps, mapDispatchToProps)(ComponentA);
2
3
4
5
6
7
8
9
10
11
12
13
14
15
16
17
18
19
ref 的使用
Refs 是使用 React.createRef() 创建的,并通过 ref 属性附加到 React 元素。
下面是几个适合使用refs 的情况:
- 管理焦点,文本选择或媒体播放。
- 触发强制动画。
- 集成第三方DOM 库。
如:
class MyComponent extends React.Component {
    onInit(e) {
        e && e.play(); // 初始化video标签就播放
    }
    render() {
        return <video ref={this.onInit} />;
    }
}
2
3
4
5
6
7
8
创建和使用ref:
class MyComponent extends React.Component {
    constructor(props) {
        super(props);
        this.myRef = React.createRef();
    }
    componentDidMount() {
        const node = this.myRef.current; // 使用ref
    }
    render() {
        return <div ref={this.myRef} />;
    }
}
2
3
4
5
6
7
8
9
10
11
12
注意:
- 你不能在函数组件上使用ref属性,因为他们没有实例;
- 你可以在函数组件内部使用ref属性,只要它指向一个DOM元素或 class 组件。
强制更新UI界面
在使用 react 和 vue 这类框架时,在切换页面、切换tab等切换场景中,主展示模块的数据会更新,但UI基本不变的情况下,容易出现页面展示未及时刷新的情况。
如:
- 切换页面场景,页面中的列表数据已更新,但展示出来的数据未及时更新;
- 切换tab,tab中的数据又banner移动且有动画,数据更新时需要展示第一张banner,展示块会触发更新内容,然后移动回第一张banner,影响用户体验。
解决办法:在展示数据的模块或组件上加上个根据数据变化而变化的 key 即可。(tab的话就在banner的父容器上加每个tab的唯一 key)
按需动态引入模块渲染页面
效果:在需要的时候动态引入模块,并渲染至页面中。
实现方法:利用 import().then() 的动态引入和 setState() 方法进行页面重新渲染。
import React, { Component } from 'react';
export default class Demo extents Component {
    renderPC() {
        const { PCComopnent } = this.state;
        const getPCComponent = mod => {
            this.setState({ PCComponent: mod.default }); // 刷新页面
        };
        if (!PCComponent) {
            import('pc-component').then(getPCComponent); // 动态imoprt
            return null;
        }
        return <PCComponet
        	{...this.props.pcProps}
        />;
    }
    render() {
        if (isPC) {
            return this.renderPC();
        }
        return <div>is phone</div>;
    }
}
2
3
4
5
6
7
8
9
10
11
12
13
14
15
16
17
18
19
20
21
22